-
How to Make a Subscription Box (Subscription Box) Ala Arlina Design - Box Subscription or English Subscription Box is a subscription widget Blog article to the admin of the Blog to get the articles latest.
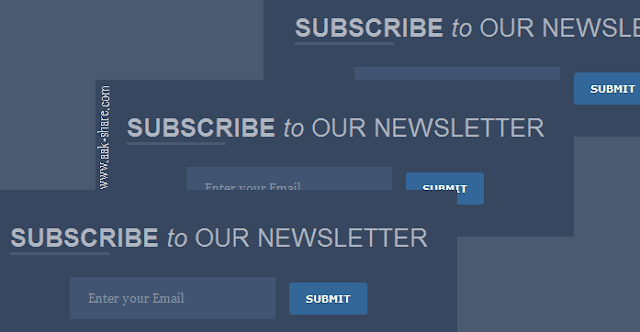
On the Subscription Box is similar like Blog Arlina Design which features blue color lebut, have hover effect, and it looks gorgeous.
The color problem you can change and customize to your desire. In the installation you follow the step by step below.
Subscription Box Blog Arlina Design
1. Sign in to Blogger
2. Select Template, Edit HTML
3. Then you find the code ]]></b:skin>, copy the code below and open above.
 /* Subscribe Box */
#subscribe-css{position:relative;padding:20px 0;background:#374760;overflow:hidden;border-top:4px solid #eee;}
.subscribe-wrapper{color:#fff;font-size:16px;line-height:normal;margin:0;text-align:center;text-transform:none;font-weight:400;width:100%}
.subscribe-form{clear:both;display:block;overflow:hidden}
form.subscribe-form{clear:both;display:block;margin:0;width:auto;overflow:hidden}
.subscribe-css-email-field{background:#415471;color:#ccc;margin:10px 0;padding:15px 20px;width:35%;border:0}
.subscribe-css-email-button{background:#3cc091;color:#fff;cursor:pointer;font-weight:700;padding:14px 30px;margin-left:15px;text-transform:none;font-size:16px;border:0;border-radius:3px;transition:all .6s}
.subscribe-css-email-button:hover{background:#37b185;}
#subscribe-css p.subscribe-note{margin:16px;text-align:center;color:rgba(255,255,255,.6);font-size:180%;font-weight:400;line-height:normal;}
#subscribe-css p.subscribe-note span {position:relative;overflow:hidden;font-weight:700;transition:all .5s}
#subscribe-css p.subscribe-note span.itatu {font-weight:400;font-style:italic;color:rgba(255,255,255,.6);text-transform:lowercase}
#subscribe-css p.subscribe-note span.itatu:before,#subscribe-css p.subscribe-note span.itatu:after{display:none}
#subscribe-css p.subscribe-note span:before{content:'';position:absolute;bottom:-2px;left:0;width:0;height:3px;margin:10px 0 0;background:rgba(255,255,255,.1);transition:all .5s}
#subscribe-css:hover p.subscribe-note span:before{width:100%;}
4. Next you find the code </body> and copy the code below, open on top of it.
<div id='subscribe-css'>
<p class='subscribe-note'><span>SUBSCRIBE</span> <span class='itatu'>TO</span> OUR NEWSLETTER</p>
<div class='subscribe-wrapper'>
<div class='subscribe-form'>
<form action='http://feedburner.google.com/fb/a/mailverify?uri=AakShare' class='subscribe-form' method='post' onsubmit='window.open ('http://feedburner.google.com/fb/a/mailverify?uri=ArlinaDesign', 'popupwindow', 'scrollbars=yes,width=550,height=520');return true' target='popupwindow'>
<input name='uri' type='hidden' value='AakShare'/><input name='loc' type='hidden' value='en_US'/><input autocomplete='off' class='subscribe-css-email-field' name='email' placeholder='Enter your Email'/><input class='subscribe-css-email-button' title='' type='submit' value='submit'/></form>
</div>
</div>
</div>
Note : Please replace all the code that is marked AakShare with id feedburner blog you
Related : How to Register Feedburner Latest
For you who want to install the Subscription Box at the bottom of the post, you find code <data:post.body/> or <div class='post-footer'>, and then copy the code above and open beneath.
5. Save the Template
So I would like tutorial How to Create a Subscription Box Blog Arlina Design, thank you for visit and hopefully useful.


 How to Make a Subscription Box (Subscription Box) Ala Arlina Design - Box Subscription or English Subscription Box is a subscription widget Blog article to the admin of the Blog to get the articles latest.On the Subscription Box is similar like Blog Arlina Design which features blue color lebut, have hover effect, and it looks gorgeous.


Post A Comment: